Teacher Appreciation Gift

Teacher appreciation gift

Having both parents as teachers and several family members that are teachers, I know first hand that teaching is hard. No matter if it’s a 2 day a week preschool or a full time high school teacher, they work hard to help our kids grow. So on the last day of school, why not shower them with some love and show our thanks?

You don’t need to spend lots of money. Most teachers really do believe that it’s the thought that counts. I like to do something more homemade to show I put thought into their gift. Plus it’s fun to get the kids involved in making a “thank you” gift for their teacher.

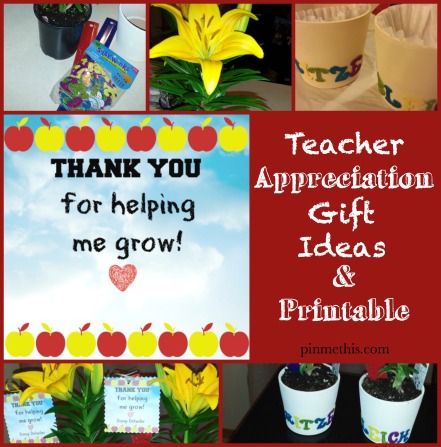
As always, I searched through Pinterest for some ideas. There are so many great ideas! One that I loved had a card that said, “Thank you for helping me grow”. That was perfect. It really fit. You can find the post from Three Kids and a Fish HERE.

Here’s what I did.

You’ll need:

Clay pot

Flower

Spray paint

Stick on Glitter Letters

Ruler

Optional – Gift card

Here’s what to do:

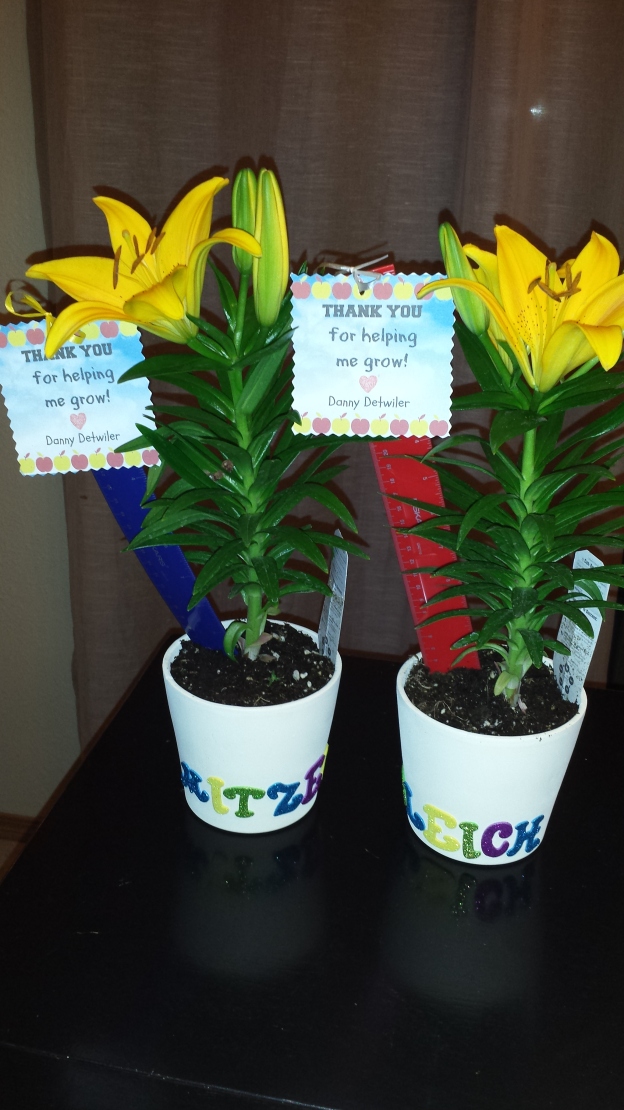
First you want to spray paint your pots. I LOVE LOVE LOVE chalky paint. If you haven’t tried it, you need to. It is amazing coverage and results! I chose an ivory color.

Then you stick on your letters. First we were just going to stick random letters all around the pot. But then my son decided that we needed to put her name on it so she would know it was for her. (ahh, I just love him!)

Once we got our letters on, we eased out the beautiful lily from it’s plastic pot and added it to our clay pot. I’m a bit of a neat freak, so I always line the pots with a coffee filter so the soil doesn’t come out of the drainage hole when you water it. 20160525_230823.jpg

I bought these rulers because they had a hole at the top, perfect for attaching my note. But they are a flexible plastic and it made it harder to get them to stand upright (you’ll see further down).

20160525_231528.jpg

I created my own “thank you” tag. Below is a blank one you can print. To get the size I used, I printed 6 to a page. I also added a Starbucks gift card to the back.

Help me grow

I attached the tags with a little ribbon and poked the rulers into the soil.

Here they are! I think they are so cute! What do you do for teacher gifts? Also check out our Lollypop bouquets! Easy to make and are sweet!

20160525_232344.jpg

pinmethis.com

Lollypop Bouquets final

Jello Parfaits

Jello Parfaits

I love parfaits! I found this PIN from Kraft where they cooled the Jello at a slant and added cool whip. I thought this would be such a creative addition to my Kentucky Derby party and something that the kids would really like.

It was a hit with adults and kids alike! I sliced up some strawberries as a garnish to top it off.

You’ll need:

Jello of choice

dish/glass for your jello (I used plastic cups)

Cool Whip

Fruit if preferred

What to do:

20160506_104424.jpg

I chose strawberry Jello and I found these plastic wine glasses at the Dollar Store that came 6 to a pack. It was a perfect single serving size. Also once the Jello was made per the instructions on the box, it filled 8 of these cups evenly without any leftover.

I had this wood U shape “box” that was a project reject but found new purpose as my glass holder. A little washi tape on the ends worked as a seatbelt to hold the glasses at an angle .

Slowly I poured the liquid Jello into the glasses. Then, with steady ninja like moves, I transferred my glasses to the fridge to set.

20160506_110810.jpg

Jello in the fridge ready to set!

After your Jello is set, pipe in some Cool Whip and garnish. It was so cute. Next time I’ll add slices of strawberries to the liquid Jello.

I also found the version below from Lea’s Cooking that I’m eager to try for the 4th of July! She has a full step-by-step tutorial on how to make this festive treat!4th jello from Lea's Cooking


Easy Window Glass Art

Window Glass Art

I’m sure by now you assume I have oodles of time to sit around and craft but the reality is I do most of my stuff after the kids have gone to bed and hubby has fallen asleep on the couch. What’s a girl to do?

This next one came to me while I was working on said crafts one night at the kitchen table. I was looking at my sliding glass door that my son and I had colored on earlier that day.

Why couldn’t the windows be part of my decor for parties, namely my Kentucky Derby Party?

20160429_203058.jpg

I printed up some wording that I created and also enlarged a picture of the Twin Spires at Churchill Downs. Oh, and some roses too. I taped them to the opposite side of the door and traced away using the Crayola crayons made for use on the windows.

20160429_203223.jpg

20160429_202948.jpg

So what do you think of my window art? Have you used these crayons?

20160429_203106.jpg

Meatball Sub Casserole

Prepare yourself for a gooey sloppy wonderful meal. This would also be a great game time favorite as well as something easy to do with the kids. The un-greased pan gives the bread a crisp bottom and edge and the cream cheese mix and pasta sauce is out of this world. It’s super easy to put together. This pin arrived from Key Ingredient.

Meatball Sub Casserole Final

Ingredients:

1 loaf Italian bread, cut into 1-inch thick slices (I use 6 slices of Texas Toast)

1 8-oz. pkg. cream cheese, softened

1/2 cup mayonnaise

1 tablespoon Italian Seasoning

1/4 tablespoon pepper

2 cups shredded mozzarella cheese, divided

Frozen Meatballs, Thawed (I used 24, 4 per slice of bread)

1 24oz jar of pasta sauce

1 cup of water (I used just over 4oz, or 1/2 a cup)

Directions:

1. Preheat the oven to 350

2. Arrange bread slices in a single layer in an ungreased 13″x9″ baking pan.

DSC02411DSC02412


3. In a bowl, combine cream cheese, mayonnaise and seasonings.

DSC02418


4. Spread mix over bread slices.

DSC02419DSC02420


5. Sprinkle with 1/2 cup cheese

DSC02423


6. Gently mix together meatballs, spaghetti sauce and water; spoon over cheese. (I laid out the meatballs, 4 per slice of bread, to appease my OCD first then spooned out the sauce after.)

DSC02424 DSC02425


DSC02427


7. Sprinkle with remaining cheese.

DSC02430


8. Bake, uncovered, at 350 degrees for 30 minutes.

DSC02432 DSC02433


This is so good. Slice per person, serves 6. But this is so hearty, half of a slice is filling for me. No doubt this was a great pin. I used a little less cheese and maybe fewer meatballs than the original post, but it’s so good. This seems to call my name on a cold rainy day and I’m sure it will be a go to when our yard is snow covered. Pretty good reheated. I try to leave it in the pan it was cooked in to heat it up in the oven for leftovers. That method seems to be the best. Enjoy friends!

DSC02435 DSC02438 DSC02439 DSC02437