Easy Window Glass Art

Window Glass Art

I’m sure by now you assume I have oodles of time to sit around and craft but the reality is I do most of my stuff after the kids have gone to bed and hubby has fallen asleep on the couch. What’s a girl to do?

This next one came to me while I was working on said crafts one night at the kitchen table. I was looking at my sliding glass door that my son and I had colored on earlier that day.

Why couldn’t the windows be part of my decor for parties, namely my Kentucky Derby Party?

20160429_203058.jpg

I printed up some wording that I created and also enlarged a picture of the Twin Spires at Churchill Downs. Oh, and some roses too. I taped them to the opposite side of the door and traced away using the Crayola crayons made for use on the windows.

20160429_203223.jpg

20160429_202948.jpg

So what do you think of my window art? Have you used these crayons?

20160429_203106.jpg

Easy DIY Derby Wreath

Derby Wreath DIY

So this is a continuation of my All Holidays Wreath.
I just removed the decoration from my daughters Purple Princess Party wreath and needed something for my Derby party.
I found some great looking rose bunches at the Dollar Store. There were 6 or 7 in a bunch for only $1! I also had my decorative nail heads that I use to attach my decoration. 

First, I pulled the roses from the stems.Then removed the green plastic base from the flower.


Next, I needed to remove the small green stem in the center so my nail head would reach. If you’re using longer stick pins you might be able to leave them.

20160425_155651.jpg

Center stem removal

Add your nail head to the center of the flower and press onto the wreath. Repeat until all flowers are added.


It looked great with just the flowers but i also had a red and neutral burlap bow to add. It just twisted on around the wreath. Here it is!

I’m still looking for a small horseshoe to add but I’ll probably end up making one.
Be sure to check out my other posts for all your Kentucky Derby needs:
Derby Party DIY
Derby Hats, Etiquette
Derby Hats, Making a Hat
Derby Hat Tutorial
Derby Printables

Derby Party Printables

Derby printables and coloring pages

I’ve been working on some printables for my party and thought I’d share.

Here are some menu tents. One set plain and one set with a menu. You can find a few of the recipes at the Kentucky Derby Official Site. Be sure to print them on card stock so they stand up well.
image

rose tents

rose tents menu1

Below are some print and frame ideas.

Always think of other places you could add a touch of decor. Maybe on the bathroom sink or even outside on the deck or patio table.

Derby printable

Derby Talk Printable

go baby go printable


Run for the Roses Printable

The watering trough sign is perfect next to your drink station.

Trough Printable


Also, If you are looking for some great stuff for the kids, I found a great site, Coloring Panda, that has cute Derby themed coloring pages you can print and have ready for the pint sized racing fans.

Why not put crayons in Mint Juleps cups or spray paint small clay pots silver to hold markers?


Window Glass Art  Derby Wreath DIY

Making a Hat 1

Derby Hat Tutorial

Derby party cover

DIY Derby Trophy Centerpiece

Derby Hats 101: Tutorial

Derby Hat Tutorial

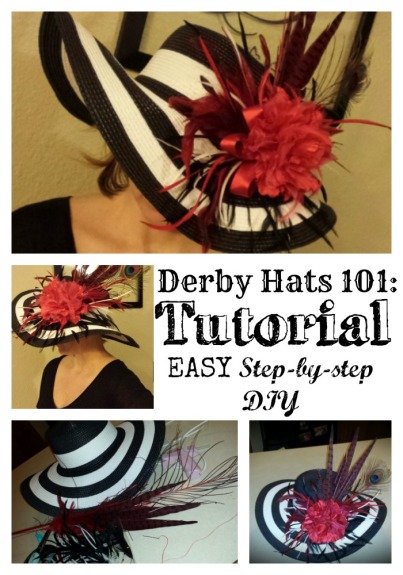
It seems that my previous post about making a hat was popular, but it was lacking a step-by-step tutorial. So I thought I’d share how I made this years hat.

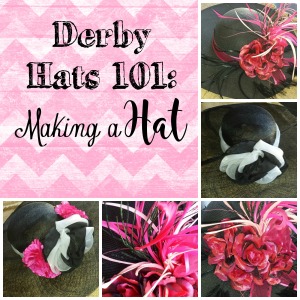
You can easily make a hat that looks like you spent a fortune or had it made. This year I found my hat at Target! $14.99 for a cute black and white stripe hat. It fit well and had a good shape.

I then went to Hobby Lobby, 40% discount coupon in hand, and wandered the store.Go with an open mind. You never know where you will find inspiration. I honestly went thinking I wanted to do big flowers. Then I found feathers. RED feathers. I gathered some that went together, knowing that if I needed more I could always go back. Since I already had red ribbon at home, as well as hot glue, thread, and extra decor, the total I spent at Hobby Lobby was no more than $10.

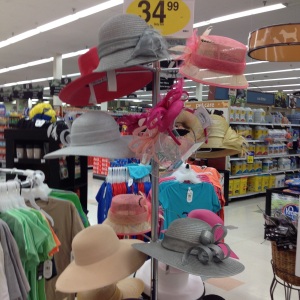
$24.99 for a Derby hat? You can’t get those prices at Kroger! I know for sure; My aunt sent me this picture while she was shopping:

IMG_07931

pinmethis.com

The Fit

First get comfy in front of a mirror and position and reposition your hat to find the most flattering style. If it has a wire brim you can play with the curves of the brim. I love the dip over one eye. Some prefer to have it sit back away from their face.

If your hat is a solid style with out a noticeable front or back, although they usually do, rotate your hat around to see if one side fits better. Once you’ve decided, if the front you are using is different from the true front you might mark it with a safety-pin. So you remember where you plan to put your decoration.

Styling Step-By-Step

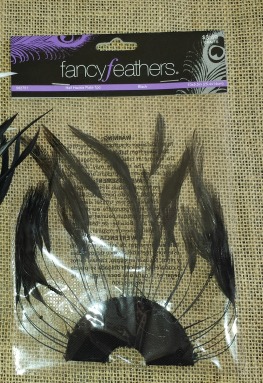
I have the black and white stripe hat, a few large bunches of red feathers, several small bunches of black and white feathers, red ribbon, and a peacock feather that has also been dyed red.

**If you are making a fascinator, all of the same methods apply,however, you may want to use smaller feathers. If you are using a headband, cut two circles from felt and hot glue two sides so you can slide the headband through the circle, one felt piece on top to hold your decoration and one on the bottom that sits against your hair.

20160421_204135.jpg

image

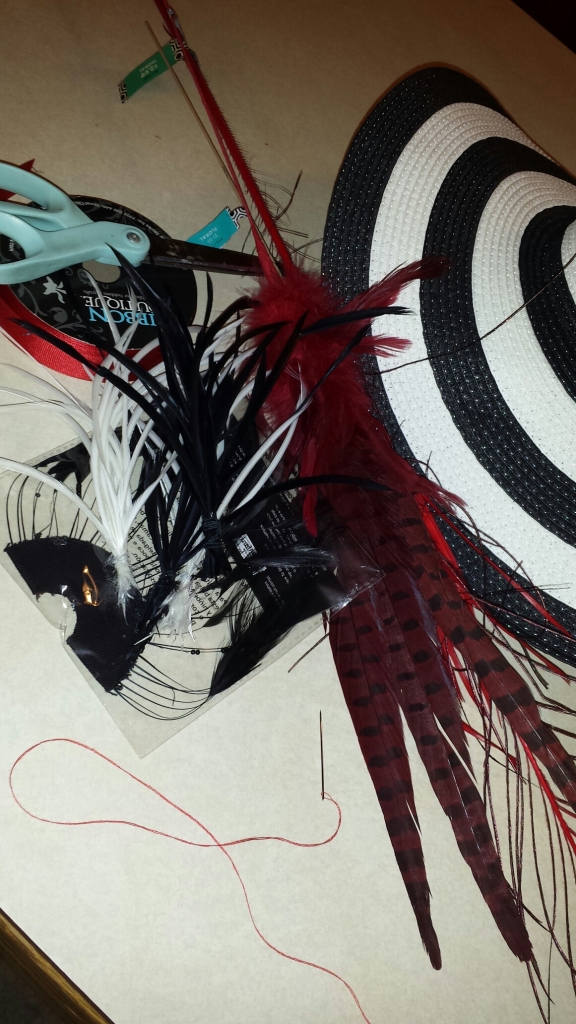
I also have at the ready, a hot glue gun, needle and thread, tape, and scissors.

Also, find something you can set your hat on as a stand so you can really work on it with the brim as you need it. I used an upside down clay pot that is in the process of being made into a cake stand.

20160422_235847

OK, this is the fun part. Just remember that you can always redo, change, alter, or even start over. There is no right or wrong way to do this. Just let the creativity flow.

If you want to put a band of ribbon around the crown do this first. You can tack it on with thread if you plan to remove it or hot glue it for a permanent solution. I like to pin/safety-pin it to the hat to hold it in place as I go. After much debate, I decided to do without this year.
image

However, I decided that I wanted to make my decoration removable because I liked the hat so much. Super great for a summer hat! If you are going to do this you can follow what I did and make a ribbon base (see below) for all that you will glue to it or cut a small piece of felt in the same color as your primary decor or hat color.

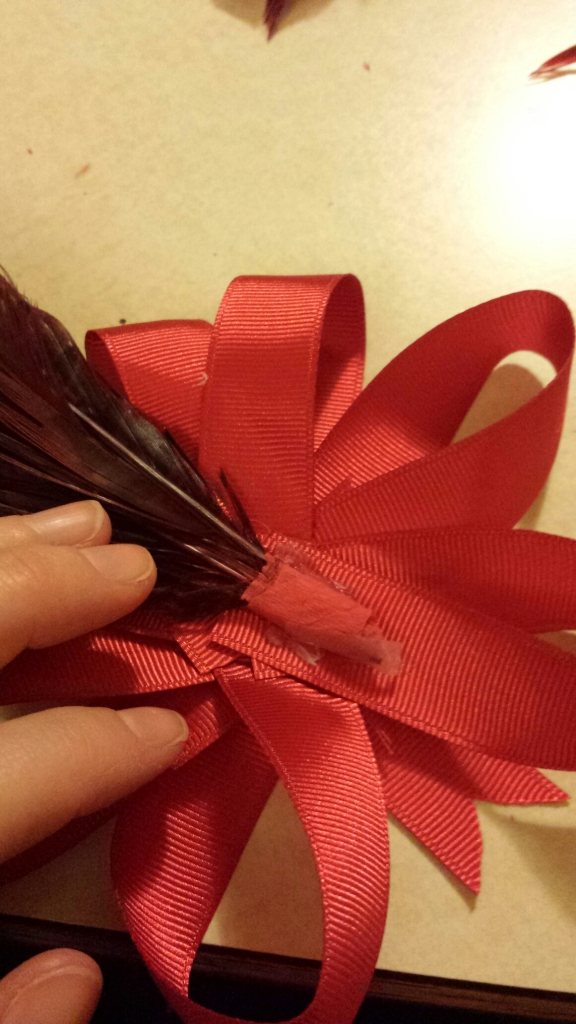
This is my base: I looped my ribbon around a few times and then attached the loops with thread. Once I had that together I used hot glue to attach a few more loops with single strands of ribbon.

Next, I took apart the feathers to separate the long feathers from the short and to remove the long wire stem.

image

Once I decided the angle on my hat I wanted for the long red feathers I hot glued them to my ribbon base. I then attached a few single sprigs of red, white, and black feathers around that with hot glue.
image

image

image

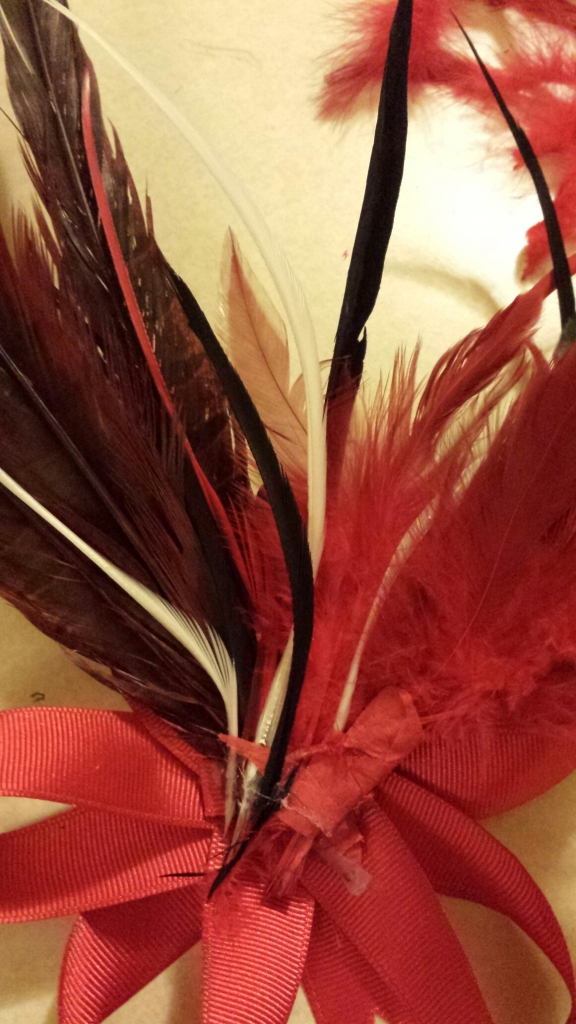
A few times I would group together single strands of feathers and hot glue ribbon around the base to keep them together and to keep my fingers from getting singed…again. I also used the end of a plastic fork to lightly press down on the feathers as the glue dried.
image

image

You want to keep following this process until you are happy with the spray of feathers or flowers. It doesn’t have to be even or symmetrical. My final addition was the peacock feather for my boost of luck!
image

image

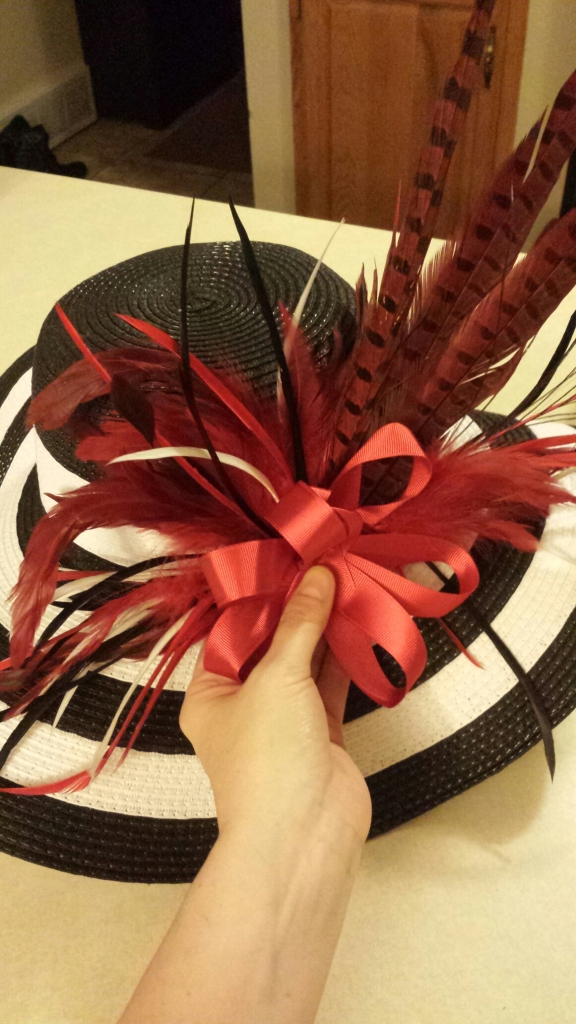
I then added the half-moon of black feathers to the bottom of the ribbon so they would rest on the brim of the hat.

feathers
image

I was really liking my finished product, but something about the ribbon just wasn’t sitting well with me. It just needed something more. I think if the ribbon was wider or had pattern I would have liked it more.

So I dug through all my brooches and hair clips and brought several to the table. One worked out to give it the WOW factor. It also had a pin on the back as well as a hair elastic.
image

image

I pinned it on the center of the ribbon and voila! GORGEOUS! How to add the entire decoration to the hat? A safety-pin of course. I just have one holding it in place right now and may add another before May 7th, but it seems secure enough.
image

image

image

image

image


image

image

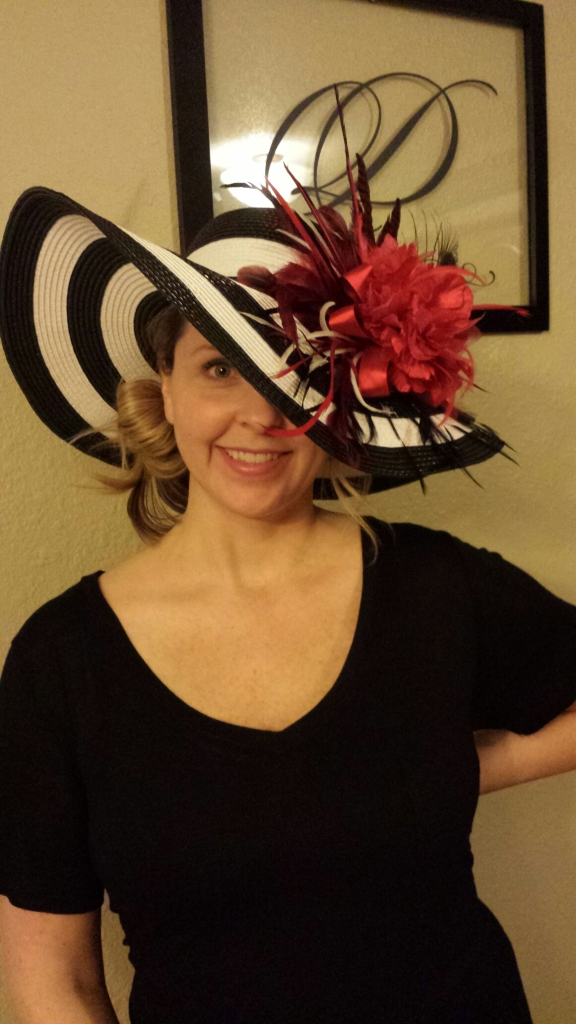
So what do you think?

It’s Derby y’all!

GO BABY GO!!

Click below for more Kentucky Derby fun:

DIY Derby Trophy Centerpiece

Etiquette and StyleMaking a HatDerby party coverDerby printables and coloring pagesDerby Wreath DIYWindow Glass Art

Purple Princess Party

Purple Princess Party1

Purple Princess Party! Try saying that 3 times fast!

My daughter turned one and I had the hardest time deciding what to do for her party theme. After much debate I decided to to create my own purple princess party. Here is how it turned out!
image

One of my favorite decor items was the chalk board I made with all of her stats. I included height and weight, her words, likes, and number of teeth. I used my chalk method to easily transfer the wording to my board.
image


I LOVE the fan and tissue puff decor posts I have seen on Pinterest and had to do one for this party. I was going to make my own tissue puffs, but decided that I needed to spend my time elsewhere, so I purchased these great white and silver puffs and purple chevron fans from Oriental Trading. My table cloths and runner were also from Oriental Trading.

20160419_183635.jpg

I also found purple hand held collapsable fans in their “Less than perfect” sale section. They were perfect and the price was even better! Always check this section!
image

Most of my time went into making my cake. I found a pin for an ombre cake from Passion for Parties. It turned out ok…I think with a bit more practice it could be great. But for my first time, it looked good and tasted great! Plus I got to set it on my new cake stand that I made previously!
image

image


Of course, I made her a tutu, that you can find here, and a matching tutu wreath to welcome our guests! For the crown on the wreath I traced the outline onto silver sparkle paper with this image:crown5
image


Making a custom candle is easy too! I spray painted a cheap dollar store candle silver and then added my purple scroll work by hand with a sharpie.

Sada candle


image

image

image

Easy DIY Cake Stand

Cake Stand

Easy DIY Cake Stand

This is now in my top 5 favorite crafts EVER! Seriously easy. Seriously fast. Seriously CUTE!

So this project started because of back to back parties that I have, one for my daughter’s 1st birthday and then my Kentucky Derby Party. Decor and themes are easy to create, but what about all the serving dishes?

Serving dishes are tricky when it comes to parties. You want something that matches your decor, but at the prices of things, you want something that you can use over and over again. Am I right?

I saw this pin from Refresh Restyle that sparked my creativity. Turning clay pots into serve ware! WHAT?! I loved the blue/green ocean color they used but it wasn’t quite practical for what I needed. Then I remembered my galvanized metal serving tray. I could make a cake stand to match!

I stopped by Walmart and picked out an 8″ clay pot and 10′ saucer. I played around with them while I was there looking at the different heights and sizes I could do. I chose these and home I went.

I already had gray chalky paint that I used for my Laundry room decor project so I gave both pieces a good coating of that.


I then used acrylic paint, a brush, and cheese cloth to transform my clay pots into galvanized metal.

I put some blobs of paint on top of a plastic bag. I like to use the plastic because it’s easy clean up and I like it better to mix my colors.
image


Then you want to dab paint, in small sections, on to the surface of the pot with the paint brush. You don’t want it to be uniform and it’s better if you mix the colors as you dab.
image

Do a small section of paint, then use the cheese cloth, again in a dabbing motion, to lightly blend the colors. Keep in mind the final look you want. The idea of metal. Mostly gray with flecks of white and tints of black. You want the white to peek out from the gray.
image

image

image

image

image

image

image

Continue this all the way around, in small sections, until it’s covered. I then hot glued the two pieces together. I’m sure there is a better glue (Refresh Restyle used E6000 glue) but hot glue I always have on hand and it works for now.

image

Easy DIY Cake Stand

I LOVE the way this turned out. I already had the paint and glue so all I spent for this project was $5!!!! No way can you get a substantial cake stand like this for $5 at the store.

I’ve had some ideas stem from this that I think I’m going to have to make. This was so much fun that I may clean out the garden department of their clay pots and saucers!! Stay tuned for my posts on the coming parties to see my new serve ware in action!!


image


Cake Stand either or.jpg


Giveaway Time

Pinmethisgiveaway.jpg

Pin Me This is officially a “.com” and to celebrate we are doing a giveaway on our facebook page. Head over, like our page and like and share our giveaway post for your chance to win this super cute 6″ horse cookie cutter I found on, you guessed it, Pinterest!

It is by Ann Clark and sold by Kentucky Restaurant Supply. Winner chosen randomly on April 23rd, the kick off of the Derby Festival!

You can also check out my other posts for a Kentucky Derby Party,  Making a Hat, Hat Etiquette, and a Tutorial to get started.

Just in time for Derby y’all!


Derby Hats 101: Making a Hat


Making a Hat 1

So now, you’ve read part one and have decided between a hat or fascinator. I’m sure you also might have an idea of what colors you will look for. Annnd we’re off! (Derby joke)

Step one, find a hat. I’ve gotten hats everywhere. Dee’s Crafts in Louisville, KY, is my go-to when I’m there. And if you’re in the area after Derby, you can get a hat for the next Derby at a huge discount!!

But just about any hat can become a Derby hat. My hat for this year I got a Target! It’s just a large brim sunhat but it fit well and has so much potential. If you are going the fascinator route, I suggest a wider headband in the base color you want. (The best headband that I used was wrapped in ribbon so I could just pin my fabric flowers on)

Step two, is heading to the craft store and looking around for something that jumps at you. Sometimes I go thinking I want flowers, then I see feathers I can’t do without or vice versa. Decide if you want to permanently attach things to your hat or headband or maybe look for things that you can attach with pins so you can remove it later.

Once you have everything you think you’ll want, do a mock set up to make sure you like it all together and the placement of items before you go gluing and possibly permanently create something you don’t like.

Below are a couple of my hats and how I put them together.

Derby Hat 2010

This hat above is one of my favorites. I spent countless hours on this one. I tacked the ribbon to the crown and then hot glued all of the feathers and silk flowers to the hat. The hat, in plain black, I had purchased the previous year after Derby and got it for next to nothing. I usually try to include a peacock feather whenever I can since they are thought to be lucky. I also wanted a signature theme for my hats.

h1.jpgThese feathers are my favorite to work with and are featured in the 2010 hat. The small ones on the left are individual strands that come in a bunch. They stand straight and you can manipulate them fairly easily.

The other, on the right, you can build off of and lay it flat on the brim of the hat as I did or even on the side of the hat so they stand up. The one on the right has a felt half moon that you could glue more feathers or flowers to and then add a pin to the back so you could make a removable hat clip or fascinator.

Derby 2012 Fascinator.jpg

Derby 2012 I decided on the fascinator. This was the only year that I bought a dress first. Let me tell you, never again! Finally, I did find a white tulle flower clip (also with pin) at Hobby Lobby and hot glued white and green feathers to to make it more extravagant. The feathers were straight so I followed this tutorial from Dee’s Crafts on how to curl feathers! It’s much easier than you’d think!

Derby 2014 Hat.jpg

Last, but certainly not least, Derby 2014. This is another hat that I was lucky to find at Dee’s after the 2013 Derby. I really liked it because it was more of a sheer fabric, but had a great wire brim so I could mold it to fit how I wanted. It also has a drawstring at the crown so you can adjust the size!

It came with the white and black sheer bow and band already attached. I found the two pink fabric flowers at a craft store for 50% off! They have a pin and clip on the back so reusing them (or the hat) will be really easy.

If you’re getting ready for the 142nd Run for the Roses, visit Kentucky Derby Party DIY for some easy crafts and foods to make your party a winner! For more ideas and hat etiquette for ladies and gents check out my post Etiquette & Style. Or you can see a full Tutorial for my 2016 Derby Hat!

DIY Derby Trophy CenterpieceDerby Wreath DIYDerby printables and coloring pages

Derby Hat 101: Etiquette & Style

Etiquette and Style.jpg

The question is as classic as, which came first the chicken or the egg? That question is which do you choose first, the dress or the hat?

Personally, I like to make my hat first. It’s easier to find a dress that will work. Although, if you are having your hat made, then it’s 6 of one and half a dozen of the other. Here are some tips from MAGGIE HEELY in an article for Louisville.com.

Etiquette

First things first, lets talk etiquette. Yes ladies, there is a proper way to wear your Derby hat. This is from the Louisville.com article:

-Women’s hats should be worn on the top of the head, not tilted back, but shadowing over one eye, preferably with the embellishments showing towards the tilt.

-Embellishments go directly to the front center or just off center in the front of the hat.

-The bigger the better.

-Your hair should be worn completely off your face, either pulled back, or if worn down it should be behind your ears…some people even poo poo bangs showing.

Men, this goes for you too! Here are tips for the gentlemen from The Art of Manliness (you can also find some great styles there too):

-Wear your hat pushed back to seem more open and accessible
-Tilt your hat over your eyes to seem mysterious and intimidating
-Tilt your hat up 1 inch from completely straight to project an all-business attitude

-Promptly remove your hat upon entering an elevator, restaurant, or someone’s        home. Never wear your hat during a meal.
-Touch the brim of your hat lightly when greeting a friend.
-Raise the hat by the crown when meeting a female friend in public.
-Remove your hat during the national anthem and place it over your heart.

Style

Now that we have that out-of-the-way. Here is a link to my Pinterest board of Derby Hat Ideas. There are so many different styles you can choose from. Popular now are fascinators. They are headbands or hair combs with a beautiful “mini hat” style and are great for those that don’t feel comfortable wearing a hat or feel like hats are flattering on them.


No matter what your choice, you can go simple or crazy with both. However, if you are attending the Derby, you want to keep in mind where you will be sitting. Sarah Schmalbruch, in an article for Business Insider, explains that if you are in the Infield, it’s a much more relaxed, shorts and T-shirt atmosphere. Heading into the grandstand and all the way up to Millionaires Row, your level of seating should dictate how formally you are dressed.

My favorite quote from that article is that “[s]he advises wearing something that’s going to make you and the people around you smile.” Couldn’t have said it better myself.

Your hat should make you feel beautiful…and lucky! On that note, the superstition is that the bigger the hat the luckier you’ll be.

hats6

The struggle is real…to find a Derby hat winner.

The above photo is courtesy of a slideshow from Daily News of crazy Derby hats. You’ll need to look. Go ahead. I’ll wait.

Get Crafty!

You can start here to get an idea and then follow-up on my next post for more how to’s from me!

Let’s talk about making your own hat or fascinator. I have done both in the past and they are both easy to complete. P.S. – I made this… has a great how-to for making a fascinator with a hair comb as a base.hat5

Also check out Making a Hat, Derby Party DIY, and my Step-by-Step Tutorial for making a hat!


Earth Day Suncatcher

Earth Day Suncatcher

Earth Day is April 22, 2016. Always looking for fun things to do with my 3-year-old, I came across this fun and easy pin from Learning and Exploring Through Play. An Earth Day suncatcher!

You need:

Blue and green tissue paper, cut into small pieces

Laminate paper, I used the self stick

Scissors

Tape or string to hang
image

I cut up my tissue paper, just a couple of lengths, and then into small squares. It doesn’t have to be perfect. You could even do a mix of cuts like triangles.
image

image

Then, I peeled the backing off of one side of the self stick laminate and put it flat on the table, sticky side up.

Let the fun begin! My son giggled endlessly as his fingers stuck to the laminate as he added the shreds of paper. We just added paper pieces until almost all of the laminate was covered.
image

image

image

Then I peeled the backing off of a second sheet and covered the tissue paper. Once we had our two pieces together with the tissue paper sandwiched in between We cut our circles. They turned out a little egg-shaped as I let my son help, but cute none the less.
image

image

image

They don’t look like much here, but wait until you hold them up to the window!

I just used a small piece of tape to stick them to the window. I like the idea of using some string so they would hang and have a bit of sway. I still have a few days to get that done!

Will you try this? Do you have a favorite Earth Day craft?